Skip to Navigation | Skip to Content

MAT 110 - Digital Imaging 1: Adobe Photoshop

Menu

Class Projects and Exercises

Class Exercises

In-class exercises will be assigned to support course lectures and demonstrations, and you should be able to complete these exercises during in-class lab time. Class exercises are pass/fail. If you complete the exercise, you will get credit. Exercises do not need to be printed and should be submitted through Canvas.

Exercise details are provided on the schedule page within the week that they are assigned.

> Go to Top

Class Projects

You are required to create original graphic artwork using Adobe Photoshop for five creative digital imaging projects, including:

Each project addresses specific Adobe Photoshop techniques. All projects must be printed on high-quality paper, properly mounted on black mat board, and ready for review at the beginning of class on the day of the critique.

This course emphasizes conceptual development and the design process in addition to the technical execution of a project. In addition to the final artwork, projects must include a typewritten artist statement or design brief supporting your visual solution that includes: a description your concept, design goals and/or communication objectives; a description of your process and how you utilized appropriate tools to complete the project, achieve stated requirements, and meet your design goals; and a self-evaluation and critical reflection wherein you comment on your project and what you perceive as the strengths and weaknesses of your final output.

In addition to the design brief, you must submit copies of the reference images used in a project (when applicable). You may also wish to include any research evidence, notes, thumbnail sketches, drafts, comprehensives, etc. that demonstrate your conceptual and creative development process.

Your original, layered Photoshop (.psd) file must be submitted via Canvas along with a flattened JPEG (.jpg) version and your design brief documentation.

See the project guidelines for more information.

> Go to Top

Digital Imaging Exploration (Blog Posts)

Through an online discussion forum/blog, we will research and explore examples of digital imaging work, artists and designers from around the world who are creating such work, and share useful resources and sites of inspiration with one another. Your research will culminate in two postings to a collaborative class ‘blog’.

See the Canvas Discussion Forums for full details.

> Go to Top

Project #1 : Old Photograph Digital Retouching Project
(100 points)

Retouch, repair, and tint an old beat-up photograph, using the one provided or a similar one of your own (use of your own photo requires instructor approval).

old photo

In this assignment, you will learn and use:

  • Digital retouching and repair techniques using Photoshop tools such as the clone stamp, healing brushes, and the patch tool.
  • Image and resolution corrections, such as cropping, straightening, sizing and setting the correct print resolution.
  • Tonal range adjustments and correction, including the use of levels, curves, and brightness and contrast as well as tools such as the dodge and burn tools.
  • Digital sepia toning and hand-coloring techniques for an aged look, using Photoshop tools and techniques including working with color, using brushes, layers, and blending modes.

Process:

  1. Using this scanned photograph or one of your own (with instructor approval), crop and straighten the image and set the image resolution to 7" x 5" at 200 ppi. See the Guidelines for Image Size and Resolution for details.
  2. Adjust the tonal range of the image as appropriate.
  3. Retouch and repair the image as cleanly and carefully as you can. Be careful to avoid destroying any texture or grain patterns.
  4. Selectively colorize your corrected photo using soft, transparent colors (to keep an aged look).
  5. Submit your assignment and design brief via file upload in Canvas. See the Assignment Submission Guidelines.

DUE DATE:

  • 9/24

> Go to Top

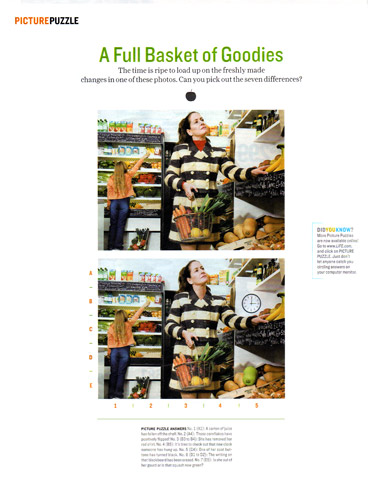
Project #2 : Photo Puzzle Project (125 points)

The scenario: Life Magazine has hired you to create a "picture puzzle" for the magazine.

photo puzzle
Click to Enlarge

Picture puzzles are visual puzzles in which two photographs are presented. The photos look identical (or nearly identical) at first glance, but upon further inspection several subtle differences can be found. Readers solve the puzzle when they find all of the differences between the photos. However, the most satisfying puzzles are the ones that are hard to solve; wherein the differences are clear once you spot them, but not obvious at first glance.

Process:

  1. Find (or shoot) an interesting photograph to use. You may wish to choose a photo with a relatively wide depth of field and that is sufficiently complex such that you can make several subtle changes to it. Make sure that your chosen photograph is at least 5 x 3.5" at 200 ppi (1000 x 700 pixels) in size.
  2. Clean up the photo if necessary and adjust its tonal range and contrast as appropriate.
  3. Create an alternate version of the photograph with 7 or 8 subtle changes from the original.
  4. In the alternate version you create, you must (at minimum) use the following techniques: image transformation (scale, rotation, flip, etc.), image colorization (color replacement, adjustment, hand coloring, etc.), image editing (removing objects, cloning objects, etc.), and image compositing using layer masking (adding an object/element from a different photograph).
  5. Strive to create a natural and unaltered look in the changed photograph. You may need to color correct or adjust the tonal range of the images that you bring into your composite so that they look natural within their new context.
  6. Design an 8.5" x 11" page (with at least 1/4" margins) in which you lay out both the original image and the changed image with each image sized at 5 x 3.5" at 200 ppi.
  7. Write a title and subhead for your puzzle and (with some consideration of appropriate typographic design) include this text on the page. Your subhead should indicate the number of differences to look for in the photos, such as "Can you spot the eight changes?" or similar. Also include the words "Picture Puzzle" somewhere on the page. Optionally, you may add other text as you feel appropriate.
  8. Lastly, design/create an answer key (in small type) that provides the answers and describes the changes in your picture puzzle. Optionally, you may wish to add check boxes so the user can check off their progress.
  9. Submit your assignment and design brief via file upload in Canvas. See the Assignment Submission Guidelines.

In this assignment, you will learn and use:

  • Image compositing using layer masks and channels.
  • Image editing and transformations, such as scale and rotation.
  • Page layout and typographic design in Photoshop.
  • Digital retouching techniques using Photoshop tools such as the clone stamp, healing brushes, the patch tool, and content-aware fills and moves.
  • Image and resolution corrections, such as cropping, straightening and setting the correct print resolution.
  • Layer styles for drop shadows and other effects.
  • Tonal range adjustments and correction.
  • Colorization techniques.

DUE DATE:

  • 10/22

> Go to Top

Project #3 : Editorial Photo Illustration Project (125 points)

photo puzzle Click to Enlarge

Editorial illustration is artwork designed to accompany written text, usually an article in a magazine, newspaper, or online publication. Editorial illustrations help illuminate the ideas within a story and encourage readers to engage with content. Most stories are accompanied by images that grab attention and provide quick insight into the themes and concepts of the writing. Photographs are often used for this purpose. But, more conceptual and complex stories don't always lend themselves to traditional photos. Publications may seek a different aesthetic, such as editorial illustration, when they want an image to convey richer and more complex ideas, stories that are multifaceted in nature, and/or ideas that are more conceptual or abstract in nature. Editorial illustrations are well suited to accompany 'think pieces' that tell a larger story than the bare facts.

Your task is to find such a story and then use Photoshop to create an artistic editorial photo illustration for it. The final composition should be an illustration that combines at least three to four separate photos into one cohesive image that conveys the ideas/themes within your chosen article. Ultimately, your job is to make an image that grabs attention, gives people a sense of the story to be told, and makes them want to read it.

This project will combine masking and blending modes (and multiple exposure) with painterly brush effects (and your own custom color palette). These technical processes will somewhat dictate the aesthetic style of your project, but you will have plenty of creative freedom to create a compelling and effective composition.

Process:

  1. Begin by searching the web (or browsing through magazines) to find a compelling article to use. Look for articles on broad, conceptual topics of interest to you.
  2. Read your chosen article thoroughly and make a mind map of the varying themes and ideas it arouses. Consider the ways in which the article is visually evocative. Then, do image research around these themes and capture a collection of images (~ 10 or 20 images) that you can potentially use within the project. Ultimately, each of these images will be converted to black and white (so the tonal range of the image is more important than the color).
  3. Review your image collection and select those images that best convey your themes and best 'fit' together within a composition. Find at least three images to combine into one photo illustration. You may wish to do some sketches or digital explorations about how your images can combine (which may lead to more image research).
  4. Your project should be sized such that in your final print, your photo illustration is at least 6" in any dimension at a minimum resolution of 200ppi. Ultimately, you will be laying out your project on an 8.5" x 11" paper, so your photo illustration should be no larger than 8" x 10.5" (to leave room for a 1/4" border). The precise size of your project is up to you, provided it fits within these dimensions and prints well to a 8.5" x 11" sheet of paper. You can begin your project by using one of your images as a base layer and sizing it accordingly or you may wish to start by creating a new image/canvas at 8.5 x 11" and 200 ppi and then import/place your images onto this canvas.
  5. Convert the images you choose to black and white and adjust their tonal range and contrast as appropriate.
  6. Combine at least 3 images to create a 'photo illustration' using masking, multiple exposure/blending, or other techniques explored in class so that your three images blend seamlessly into one composition.
  7. Create a custom color palette of 3 to 5 colors for your composition and apply the palette using gradient maps, painting and custom brushes, color mixing, blending, or other techniques.
  8. Submit your assignment and design brief via file upload in Canvas. See the Assignment Submission Guidelines. In your design brief, be sure to include a link to or copy of the article that inspired your composition. Include as process documentation the original images you used in your composition.

In this assignment, you will learn and use:

  • Image compositing using layer masks and channels.
  • Tonal range adjustments and correction.
  • Mind Mapping and Image Acquisition
  • Layer and Compositing Techniques
  • Gradient Masks
  • Blending Modes
  • Adjustment Layers
  • Clipping Masks
  • Mixing and Blending Color
  • Gradient Maps
  • Custom Brushes and the Mixer Brush
  • Filters and Effects

DUE DATE:

  • Digital Rough Draft Due 11/10; Final Printed Version Due 11/12

> Go to Top

Project #4 : Movie Poster Design Project (150 points)

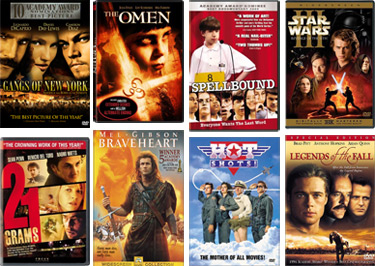
You will create a Movie Poster or Blue Ray/DVD Cover for a motion picture that you will invent. The cover will be a a composite, montage-style photo illustration, combining at least 3 separate photos into the final composition.

Begin by choosing a genre and title for your movie. Is it a thriller, a drama, film noir, a documentary, a comedy, a horror movie, an action flick, etc.? You can use a current movie as a model (ie, it is similar to...), but may not use any imagery or titles from a real film. Your poster or cover must be completely invented and original.

dvds

It is essential that the imagery and graphic elements you choose (including font styles, colors, composition, etc.) thematically represent your concept. In other words, your design should function to reveal the genre, theme, and style of your motion picture idea. Your design should serve your concept.

Process:

  1. If you choose to make a Blue Ray and/or DVD cover, the final size should be exactly 5.125" x 7.25 " at 200 - 300 ppi. If you choose to make a movie poster, the final size should be 6" x 9" at 200 - 300 ppi. These sizes will allow you to print at home or in the library. Typical movie posters are actually 24" x 36" in size, but it is too expensive to print at this scale and too large in file size to submit via Canvas.

  2. Begin by researching various genre movie poster or DVD covers which incorporate collaged or composite imagery in the layout. You may wish to look at posters on IMP Awards, Movie Posters.com, Wikimedia, or IMDB for inspiration.

  3. Write two brief (and different) proposal themes, abstracting your basic story plot and identifying a genre for your movie. Come up with a title and sub-title (tag line, catch phrase) for your movie idea. Sketch out some simple thumbnails and design ideas to quickly get some ideas on design elements, layout and composition.

  4. Find potential imagery to use in your design. The project requires that you create a composite design using at least 3 separate images (one of these images can simply create the background texture, however). See Image/Stock Resources to search for images.

  5. Beyond the 3 composite images on your poster or cover, you are required to typographically design and include a title, the fictional names of 1 - 5 of the starring actors or actresses, your name (represented either as one of the stars of the film, or as the director... such as "A Karl Cleveland Picture" or "A Film By Karl Cleveland"), and at least one or two other pieces of text for such things as a sub-head or tag-line for the film, or reviews such as "Two Thumbs Up", or call-outs such as "In Theaters May 31st" or "Bonus features include deleted scenes and an alternate ending" or "Academy Award Winner" etc. Be creative with your type. You may optionally include this Blue Ray Logo or this DVD Logo on your project (if doing a cover).

  6. You required to use the following techniques/tools in Photoshop: layer masking and compositing, blending modes, a gradient mask, filter-effects, adjustment layers, type and layer styles, and any other techniques and/or styles appropriate to your concept. While these tools/techniques are required, you should be careful to ensure that they are not applied haphazardly, but function to serve your concept and reveal the theme(s) of your movie.

  7. Use your images to create a photo-illustration that thematically represents your movie idea. Strive to have your images blend together seamlessly in the design. Be sensitive to design aesthetics and design principles such as balance, consistency, alignment, dominance and hierarchy, rhythm, repetition, movement, and contrast.

  8. Submit your assignment and design brief via file upload in Canvas. See the Assignment Submission Guidelines.

In this assignment, you will learn and use:

  • Image compositing using layer masks and channels
  • Gradient masks
  • Adjustment layers
  • Image editing and transformations
  • Typographic design in Photoshop
  • Layer styles
  • Blending modes
  • Filter effects
  • Digital retouching techniques
  • Image and resolution corrections
  • Tonal range adjustments and correction
  • Colorization techniques

DUE DATE:

  • Rough Draft (not printed) due 12/1, Final Draft (printed) due 12/3

> Go to Top

Project #5 : Digital Art Collage / Visual Narrative Project (150 points)

collage n. {Fr., a pasting < colle, paste < Gr. kolla, glue} An art form in which bits of objects are pasted together in incongruous relationship for their symbolic or suggestive effect.

Using Photoshop, create an artistic digital collage/photo illustration. The final composition should be a composite, collage-style illustration that combines at least five separate photos, scanned objects, or graphic elements. At least one of these elements must be scanned (or photographed) by you and include something that you have hand-drawn, text that you have hand-written, or a found object placed on the scanner glass. You must use graphic texture (background texture) as part of the composition.

The final output of the project can either be on standard 8.5" x 11" paper or you can choose a larger size, such as 11"x17", 12"x18", or 13"x19" (Please note, however, that projects at this scale my become very larger in file size and may be too large to upload to Canvas. If you choose to work at a large scale, you may need to downsize the the final output/psd for submission).

You should create your project using a resolution of 240 ppi or 300 ppi and strive to achieve the best quality that you can. This means no low-res images (such as most images on the Web).

The final Digital Art Collage Project is designed to allow you to showcase your Photoshop skills while working on a theme that is of personal interest to you. It is the most flexible project, with the least technical restrictions. However, it is perhaps the most conceptually challenging as you must create your own concept.

Choose a theme for your Digital Art Collage Project, and use metaphor and symbolic representation to create a visual narrative around that theme. Choose your graphic elements for their symbolic or suggestive effect. It is essential that the imagery and graphic elements you choose thematically represent your concept.

Appropriate concepts include:

  • Creating a symbolic personal narrative (i.e. creating a visual narrative to tell the story of something about you or that has happened to you)
  • Creating self portrait/collage (if you choose to do a self portrait, do not be literal and simply use a picture of your face; rather use visual elements and styles that represent you)
  • Exploring a poem or idea in visual form
  • Exploring and/or commenting on a political, social, or cultural theme
  • Visually exploring abstract concepts such as love, fear, hate, etc., or topics such as discrimination, consumerism, etc.

As an alternative to this 'Digital Art Collage Project' but utilizing similar compositing and photo illustration techniques, for your final project you may choose to extend upon and/or recreate the Editorial Photo Illustration or Movie Poster Design project with the goal of turning it into a solid artistic and portfolio-worthy piece.

Submit your assignment and design brief via file upload in Canvas. See the Assignment Submission Guidelines.

You may wish to research and explore the artwork of featured artists from the class including:

DUE DATE:

  • 12/10

> Go to Top